
JOOQ
JOOQ란?
JOOQ(Java Oriented Querying)는 Java를 사용하여 안전한 SQL 쿼리를 작성할 수 있도록 하는 데이터베이스 쿼리 프레임워크 입니다. 개발자가 SQL 쿼리를 보다 직관적이고 자연스럽게 작성할 수 있도록 하며 type-safe한 API를 제공합니다. 이를 통해 컴파일시 오류를 발견 / 수정할 수 있습니다.
JOOQ는 PostgreSQL, Oracle, MySQL과 같은 관계형 데이터베이스들을 지원합니다. NoSQL은 기본적으로 지원하지 않습니다. 일부 제한적인 기능을 제공하긴 하는데 그럴빠에야 Spring Data MongoDB 와 같이 해당 영역에 특화된 프레임워크를 사용하는게 좋습니다.
JOOQ는 단순 쿼리 작업 외에도 데이터베이스 스키마 생성, 코드 생성 및 기타 데이터베이스 관련 작업을 지원하므로 Java에서 데이터베이스 기반 애플리케이션을 구축하는데 유용한 도구입니다.
JOOQ vs Querydsl
JOOQ과 Querydsl은 개발자가 type-safe한 SQL 쿼리를 작성할 수 있도록 한다는 공통점이 있습니다. 그러나 두 프레임워크 사이에는 몇가지 차이점이 있습니다.
- DSL 구문
- JOOQ는 SQL 구문을 기반으로 DSL을 사용합니다.
- Querydsl은 Java 구문을 기반으로 하는 DSL을 사용합니다.
- 지원 범위
- JOOQ는 관계형 데이터베이스들을 중점으로 지원합니다.
- Querydsl은 관계형 데이터베이스와 비관계형 데이터베이스(NoSQL)을 모두 지원합니다.
- 코드 생성
- JOOQ는 데이터베이스 스키마를 기반으로 Java 클래스를 생성합니다.
- QueryDSL은 자바 코드를 바탕으로 Java 클래스를 생성합니다.
그래서 둘중 무엇을 선택해야 하는가?
사실 개인적인 생각으론 JOOQ와 Querydsl를 비교하는건 잘못됐다고 생각합니다. 어떤 Persistence Framework를 선택했느냐(ORM이냐 SQL이냐) 에 따라 달라지기 때문이죠.
스프링 기반 웹 어플리케이션을 개발할때 관계형 데이터베이스를 사용한다면 Persistence Framework로 ORM 혹은 SQL Mapper를 선택합니다. ORM의 경우 Hibernate - Spring Data JPA - Querydsl조합을 사용하고 SQL Mapper의 경우 MyBatis를 사용합니다. SQL Mapper 를 선택했다면 JOOQ는 MyBatis 대신 사용할 수 있는 프레임워크라고 할 수 있습니다. XML 기반인 MyBatis와 다르게 Java로 type-safe하게 쿼리를 작성할 수 있기 때문이죠.
따라서 만약 개발중인 어플리케이션이 MyBatis를 사용하고 type-safe하게 쿼리를 작성할 수 있는 프레임워크를 찾고있다면 JOOQ는 완벽한 프레임워크라고 볼 수 있습니다. ORM을 사용한다면 비즈니스 로직에는 Hibernate - Spring Data JPA - Querydsl조합을 사용하고 통계성 데이터나 대용량 배치 작업을 할때, 혹은 native query가 필요할 때 JOOQ를 사용하는 것이 좋다고 생각합니다.
Spring Boot에서 JOOQ 사용하기
Spring Boot 에서 JOOQ를 사용하는 방법에 대해 알아보도록 하겠습니다.
1.환경설정
빌드 도구는 maven을 사용하며 db는 PostgreSQL을 사용합니다.
1
2
3
4
5
6
7
8
9
10
11
12
13
14
15
16
17
18
19
20
<dependencies>
    <dependency>
        <groupId>org.springframework.boot</groupId>
        <artifactId>spring-boot-starter-jooq</artifactId>
        <version>3.0.5</version>
    </dependency>

    <dependency>
        <groupId>org.postgresql</groupId>
        <artifactId>postgresql</artifactId>
        <version>42.6.0</version>
        <scope>runtime</scope>
    </dependency>
    <dependency>
        <groupId>org.springframework.boot</groupId>
        <artifactId>spring-boot-starter-test</artifactId>
        <version>3.0.5</version>
        <scope>test</scope>
    </dependency>
</dependencies>
다음으로 테이블을 생성합니다.
1
2
3
4
5
6
7
8
9
10
11
12
13
14
15
16
17
18
19
20
21
CREATE TABLE author (
                        id             SERIAL          NOT NULL PRIMARY KEY,
                        first_name     VARCHAR(50),
                        last_name      VARCHAR(50)     NOT NULL
);

CREATE TABLE book (
                      id             SERIAL          NOT NULL PRIMARY KEY,
                      title          VARCHAR(100)    NOT NULL
);

CREATE TABLE author_book
(
    author_id INT NOT NULL,
    book_id   INT NOT NULL,

    PRIMARY KEY (author_id, book_id),
    CONSTRAINT fk_ab_author FOREIGN KEY (author_id) REFERENCES author (id)
        ON UPDATE CASCADE ON DELETE CASCADE,
    CONSTRAINT fk_ab_book FOREIGN KEY (book_id) REFERENCES book (id)
);

테이블을 생성했다면 spring datasource를 정의합니다. 만약 방언을 지정하지 않는다면 DEFAULT 를 사용합니다.
1
2
3
4
5
6
7
spring.datasource.url=jdbc:postgresql://localhost:5432/jooq
spring.datasource.username=username
spring.datasource.password=password
spring.datasource.driver-class-name=org.postgresql.Driver
spring.jooq.sql-dialect= postgres

logging.level.org.jooq.tools.LoggerListener=DEBUG
이제 maven 플러그인을 통해 생성한 테이블을 기반으로 자바 클래스를 생성할 것입니다.
1
2
3
4
5
6
7
8
9
10
11
12
13
14
15
16
17
18
19
20
21
22
23
24
25
26
27
28
29
30
31
32
33
34
35
36
37
38
39
40
41
42
43
44
45
46
47
48
49
50
51
52
53
54
55
56
57
58
59
60
61
62
63
<plugin>
    <groupId>org.codehaus.mojo</groupId>
    <artifactId>properties-maven-plugin</artifactId>
    <version>1.1.0</version>
    <executions>
        <execution>
            <phase>initialize</phase>
            <goals>
                <goal>read-project-properties</goal>
            </goals>
            <configuration>
                <files>
                    <file>src/main/resources/application.properties</file>
                </files>
            </configuration>
        </execution>
    </executions>
</plugin>
<plugin>
    <groupId>org.jooq</groupId>
    <artifactId>jooq-codegen-maven</artifactId>
    <executions>
        <execution>
            <id>generate-postgres</id>
            <phase>generate-sources</phase>
            <goals>
                <goal>generate</goal>
            </goals>
            <configuration>
                <!-- JDBC connection parameters -->
                <jdbc>
                    <url>${spring.datasource.url}</url>
                    <user>${spring.datasource.username}</user>
                    <password>${spring.datasource.password}</password>
                    <driver>${spring.datasource.driver-class-name}</driver>
                </jdbc>
                <!-- Generator parameters -->
                <generator>
                    <database>
                        <name>
                            org.jooq.meta.postgres.PostgresDatabase
                        </name>
                        <includes>.*</includes>
                        <excludes/>
                        <inputSchema>public</inputSchema>
                        <includeSystemSequences>true</includeSystemSequences>
                    </database>
                    <generate>
                        <pojos>true</pojos>
                        <pojosEqualsAndHashCode>true</pojosEqualsAndHashCode>
                        <javaTimeTypes>true</javaTimeTypes>
                        <fluentSetters>true</fluentSetters>
                        <sequences>true</sequences>
                    </generate>
                    <target>
                        <packageName>com.keencho.jooq.model</packageName>
                        <directory>target/generated-sources/jooq</directory>
                    </target>
                </generator>
            </configuration>
        </execution>
    </executions>
</plugin>
프로퍼티 파일에 접근하기 위해 properties-maven-plugin을 사용합니다. jooq-codegen-maven 플러그인을 사용하며 설정에 jdbc 정보, db명, 옵션, 타겟 패키지, 타겟 디렉토리 등 필요한 정보들을 입력합니다.
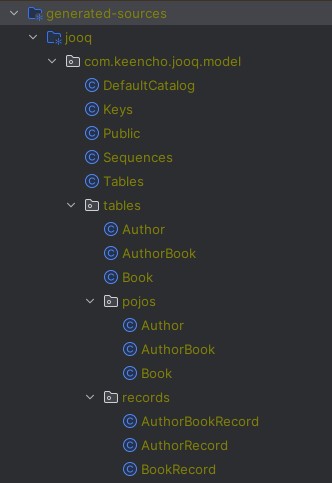
필요한 정보를 모두 입력 했다면 mvn clean generate-sources 명령을 수행합니다. 아래처럼 클래스가 생성되었다면 성공입니다.
2. 코드작성
1. 전처리
테스트 수행 전에 테이블을 초기화하고 새로운 값을 넣는 전처리 코드입니다.
1
2
3
4
5
6
7
8
9
10
11
12
13
14
15
16
17
18
19
20
21
22
23
24
25
26
27
28
29
30
31
32
33
34
35
36
37
38
39
40
41
42
43
44
45
46
47
48
49
50
51
52
53
54
55
56
57
58
59
60
61

@Autowired
DSLContext dslContext;

@BeforeAll
public void setUp() {
    // author
    dslContext.delete(AUTHOR).execute();
    dslContext.alterSequence(AUTHOR_ID_SEQ).restart().execute();
    dslContext
            .insertInto(
                    AUTHOR,
                    AUTHOR.FIRST_NAME,
                    AUTHOR.LAST_NAME
            )
            .valuesOfRows(
                    Stream.of("홍길동", "김철수", "박영희").map(name -> DSL.row(
                            name.substring(0, 1),
                            name.substring(1, 3)
                    )).collect(Collectors.toList())
            )
            .execute();

    // book
    dslContext.delete(BOOK).execute();
    dslContext.alterSequence(BOOK_ID_SEQ).restart().execute();
    dslContext
            .insertInto(
                    BOOK,
                    BOOK.TITLE
            )
            .valuesOfRows(
                    Stream.of(
                            "이펙티브 자바", "리팩토링", "DDD START!", "토비의 스프링3",
                                    "Do it! 점프 투 파이썬", "혼자 공부하는 머신러닝+딥러닝", "개발자를 위한 챗GPT 활용법",
                                    "C언어로 쉽게 풀어쓴 자료구조", "비전공자도 이해할 수 있는 AI 지식", "모던 자바스크립트 Deep Dive"
                                    )
                            .map(DSL::row)
                            .collect(Collectors.toList())
            )
            .execute();

    var rand = new Random();
    var authorList = dslContext.selectFrom(AUTHOR).fetch();
    var bookList = dslContext.selectFrom(BOOK).fetch();

    bookList.forEach(book -> dslContext
            .insertInto(
                    AUTHOR_BOOK,
                    AUTHOR_BOOK.AUTHOR_ID,
                    AUTHOR_BOOK.BOOK_ID
            )
            .valuesOfRows(
                    DSL.row(
                            authorList.get(rand.nextInt(authorList.size())).get(AUTHOR.ID),
                            book.get(BOOK.ID)
                    )
            )
            .execute()
    );
}
author,book,author_book테이블의 모든 row를dslContext.delete(TABLE).excute()메소드로 삭제합니다.- 시퀀스가 존재하는
author,book테이블의 경우dslContext.alterSequence(SEQUENCE).restart().execute()메소드를 통해 시퀀스를 초기화 합니다. - 각 테이블에 데이터를 삽입합니다.
참고로 dslContext의 경우 spring.datasource를 올바르게 정의하였다면 JooqAutoConfiguration 클래스에 의해 자동으로 bean으로 등록되어 사용할 수 있게 됩니다.

2. 조회후 custom class로 결과 반환
1
2
3
4
5
SELECT b.title, concat(a.first_name, a.last_name)
FROM author_book ab
         LEFT JOIN author a ON ab.author_id = a.id
         LEFT JOIN book b ON ab.book_id = b.id
WHERE a.first_name = '홍';
1
2
3
4
5
6
7
8
9
10
11
12
13
14
15
16
17
18
19
20
static class Projection {
    String author;
    String title;
}

@Test
void fetchIntoCustomClass() {
    var list = dslContext
            .select(
                    BOOK.TITLE,
                    AUTHOR.FIRST_NAME.concat(AUTHOR.LAST_NAME).as("author")
            )
            .from(AUTHOR_BOOK)
            .leftJoin(AUTHOR).on(AUTHOR.ID.eq(AUTHOR_BOOK.AUTHOR_ID))
            .leftJoin(BOOK).on(BOOK.ID.eq(AUTHOR_BOOK.BOOK_ID))
            .where(AUTHOR.FIRST_NAME.eq("홍"))
            .fetchInto(Projection.class);

    Assertions.assertTrue(list.stream().allMatch(item -> StringUtils.hasText(item.title) && item.author.charAt(0) == '홍'));
}
1
2
3
4
5
6
7
8
9
10
11
12
13
14
15
16
17
18
19
select
  "public"."book"."title",
  ("public"."author"."first_name" || "public"."author"."last_name") as "author"
from "public"."author_book"
  left outer join "public"."author"
    on "public"."author"."id" = "public"."author_book"."author_id"
  left outer join "public"."book"
    on "public"."book"."id" = "public"."author_book"."book_id"
where "public"."author"."first_name" = '홍'

org.jooq.tools.LoggerListener - Fetched result           : +-------------------+------+
org.jooq.tools.LoggerListener -                          : |title              |author|
org.jooq.tools.LoggerListener -                          : +-------------------+------+
org.jooq.tools.LoggerListener -                          : |토비의 스프링3           |홍길동   |
org.jooq.tools.LoggerListener -                          : |Do it! 점프 투 파이썬    |홍길동   |
org.jooq.tools.LoggerListener -                          : |C언어로 쉽게 풀어쓴 자료구조   |홍길동   |
org.jooq.tools.LoggerListener -                          : |모던 자바스크립트 Deep Dive|홍길동   |
org.jooq.tools.LoggerListener -                          : +-------------------+------+
org.jooq.tools.LoggerListener - Fetched row(s)           : 4
결과가 잘 반환된 것을 확인할 수 있습니다. alias로 필드명을 지정하면 해당 필드에 값이 할당되는 것까지 마음에 드네요.
3. update
1
2
3
4
UPDATE author
SET first_name = '성'
WHERE id = 1
   or id = 2;
1
2
3
4
5
6
7
8
9
10
11
12
13
@Test
void update() {
    var condition = AUTHOR.ID.eq(1).or(AUTHOR.ID.eq(2));
    dslContext
            .update(AUTHOR)
            .set(AUTHOR.FIRST_NAME, "성")
            .where(condition)
            .execute();

    var list = dslContext.selectFrom(AUTHOR).where(condition).fetchInto(Author.class);

    Assertions.assertTrue(list.stream().allMatch(item -> item.getFirstName().equals("성")));
}
1
2
3
4
5
6
7
8
9
10
11
12
13
14
15
16
17
18
19
20
21
22
update "public"."author"
set
  "first_name" = '성'
where (
  "public"."author"."id" = 1
  or "public"."author"."id" = 2
)
org.jooq.tools.LoggerListener - Affected row(s)          : 2

select "public"."author"."id", "public"."author"."first_name", "public"."author"."last_name"
from "public"."author"
where (
  "public"."author"."id" = 1
  or "public"."author"."id" = 2
)
org.jooq.tools.LoggerListener - Fetched result           : +----+----------+---------+
org.jooq.tools.LoggerListener -                          : |  id|first_name|last_name|
org.jooq.tools.LoggerListener -                          : +----+----------+---------+
org.jooq.tools.LoggerListener -                          : |   1|성         |길동       |
org.jooq.tools.LoggerListener -                          : |   2|성         |철수       |
org.jooq.tools.LoggerListener -                          : +----+----------+---------+
org.jooq.tools.LoggerListener - Fetched row(s)           : 2
author 테이블의 id가 1 혹은 2인 row의 first_name을 ‘성’ 으로 변경하는 쿼리를 수행하였고 작업이 정상적으로 수행되었습니다.
4. delete
1
2
3
DELETE
FROM author
WHERE id = 1;
1
2
3
4
5
6
7
8
9
10
@Test
void delete() {
    dslContext.delete(AUTHOR).where(AUTHOR.ID.eq(1)).execute();

    var authorList = dslContext.selectFrom(AUTHOR).fetchInto(Author.class);
    var authorBookList = dslContext.selectFrom(AUTHOR_BOOK).fetchInto(AuthorBook.class);

    Assertions.assertTrue(authorList.stream().noneMatch(item -> item.getId() == 1));
    Assertions.assertTrue(authorBookList.stream().noneMatch(item -> item.getAuthorId() == 1));
}
1
2
3
4
5
6
7
8
9
10
11
12
13
14
15
16
17
18
19
20
21
22
23
24
25
26
delete from "public"."author"
where "public"."author"."id" = 1
org.jooq.tools.LoggerListener - Affected row(s)          : 1

select "public"."author"."id", "public"."author"."first_name", "public"."author"."last_name"
from "public"."author"
org.jooq.tools.LoggerListener - Fetched result           : +----+----------+---------+
org.jooq.tools.LoggerListener -                          : |  id|first_name|last_name|
org.jooq.tools.LoggerListener -                          : +----+----------+---------+
org.jooq.tools.LoggerListener -                          : |   2|김         |철수       |
org.jooq.tools.LoggerListener -                          : |   3|박         |영희       |
org.jooq.tools.LoggerListener -                          : +----+----------+---------+
org.jooq.tools.LoggerListener - Fetched row(s)           : 2

select "public"."author_book"."author_id", "public"."author_book"."book_id"
from "public"."author_book"
org.jooq.tools.LoggerListener - Fetched result           : +---------+-------+
org.jooq.tools.LoggerListener -                          : |author_id|book_id|
org.jooq.tools.LoggerListener -                          : +---------+-------+
org.jooq.tools.LoggerListener -                          : |        3|      1|
org.jooq.tools.LoggerListener -                          : |        3|      2|
org.jooq.tools.LoggerListener -                          : |        2|      4|
org.jooq.tools.LoggerListener -                          : |        2|      5|
org.jooq.tools.LoggerListener -                          : |        3|      7|
org.jooq.tools.LoggerListener -                          : +---------+-------+
org.jooq.tools.LoggerListener - Fetched row(s)           : 5 (or more)
author 테이블의 id가 1인 row를 삭제하였고 author, author_book 테이블의 row가 삭제된것을 확인할 수 있습니다.
번외(DAOImpl)
JOOQ는 중복되는 불필요한 코드를 줄이기 위해 생성된 DAO에 대한 기본 구현체들을 제공합니다. 스프링 환경에서는 AbstractSpringDAOImpl 클래스를 상속한 DAO를 주입받아 사용할 수 있으며 이 DAO 클래스는 jooq-codegen-maven 플러그인에 설정값을 추가하는것으로 쉽게 생성할 수 있습니다.
1
2
3
4
5
6
7
8
9
10
11
12
<generate>
    <pojos>true</pojos>
    <pojosEqualsAndHashCode>true</pojosEqualsAndHashCode>
    <javaTimeTypes>true</javaTimeTypes>
    <fluentSetters>true</fluentSetters>
    <sequences>true</sequences>

    <!-- for spring-->
    <daos>true</daos>
    <springDao>true</springDao>
    <springAnnotations>true</springAnnotations>
</generate>
doas, spirngDao, springAnnotations 세개의 설정값을 추가하였습니다. 설정값을 추가했다면 코드를 생성하고 관련 클래스들이 생성되었는지 확인합니다.
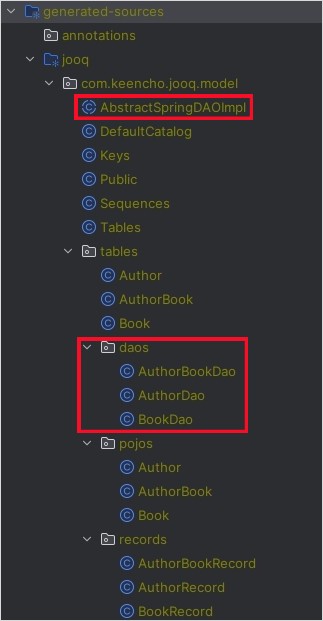
그럼 이제 생성된 DAO들을 주입받고 사용할 수 있습니다.
1
2
3
4
5
6
7
8
9
10
11
12
13
14
15
16
17
18
19
20
21
22
23
24
25
26
27
28
29
30
31
32
33
@Autowired
AuthorDao authorDao;

@Autowired
AuthorBookDao authorBookDao;

@Test
void select() {
    var list = authorDao.fetch(Tables.AUTHOR.FIRST_NAME, "홍");

    Assertions.assertTrue(list.stream().allMatch(item -> item.getFirstName().equals("홍")));
}

@Test
void update() {
    authorDao.update(
            authorDao
                    .fetchRangeOfId(1, 2)
                    .stream()
                    .peek(item -> item.setFirstName("성"))
                    .collect(Collectors.toList())
    );

    Assertions.assertTrue(authorDao.fetchRangeOfId(1, 2).stream().allMatch(item -> item.getFirstName().equals("성")));
}

@Test
void delete() {
    authorDao.deleteById(1);

    Assertions.assertFalse(authorDao.existsById(1));
    Assertions.assertTrue(authorBookDao.fetchByAuthorId(1).isEmpty());
}
확실히 코드가 줄긴 했습니다. 다만 그냥 dslContext를 사용하는 것에 비해 많은 기능(메소드)들이 제거되어 있습니다. 따라서 간단한 쿼리정도에만 사용하고 나머지는 dslContext를 그대로 사용하는게 좋아 보입니다.
결론
JOOQ에 대해 살펴 보았습니다. 위에서 살펴본 예제는 정말 간단한 CRUD만 테스트 해본 것으로 실제 JOOQ는 보다 많은 DB의 기능을 지원합니다. 또한 문서가 매우 잘되어 있어서 처음 시작하시는 분들도 최소한의 삽질로 사용해 보실 수 있을것 같습니다. 만약 ORM을 사용하지 않고 SQL Mapper 기반의 어플리케이션을 개발중이시거나 기존의 Querydsl에 익숙하신 분들이라면 JOOQ를 사용해 보시는게 어떨까요?