커맨드 패턴
커맨드 패턴은 실행될 기능을 객체의 형태로 캡슐화 함으로써 여러 기능을 실행할 수 있는 재사용성이 높은 클래스를 설계하는 패턴 입니다. 이 패턴은 어떤 이벤트가 발생했을 때 실행될 기능이 다양하면서 여러가지 변경이 필요한 경우에 이벤트를 발생시키는 클래스를 변경하지 않고 재사용 할 때 유용합니다.
구조
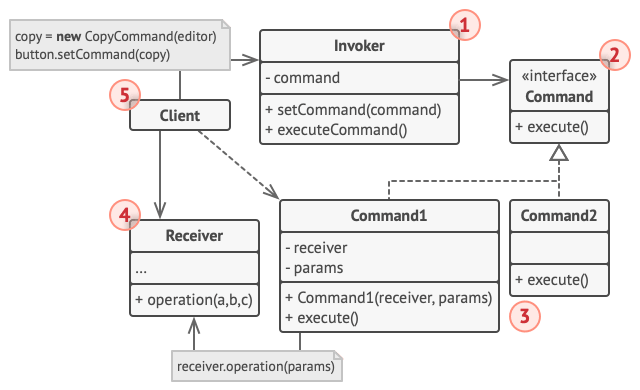
- 호출자는 요청을 시작하는 역할을 합니다. 이 클래스에는 명령 객체를 참조하는 필드가 있어야 합니다. 호출자는 요청을 수신자에게 직접 보내는 대신 해당 명령을 트리거합니다.
- 커맨드 인터페이스는 대체로 명령을 실행하기 위한 단일 메소드만 선언합니다.
- 커맨드 터페이스의 구현 클래스는 다양한 종류의 요청들을 상속합니다. 구현 클래스는 자체적으로 작업을 수행하는 것이 아니라 비즈니스 로직 객체중 하나로 이러한 명령을 전달해야 합니다.
- 명령을 전달받는 수신 클래스에는 비즈니스 로직을 포함하고 있습니다. 거의 모든 객체가 수신자처럼 동작될 수 있습니다.
- 클라이언트 코드는 구체적인 명령 객체를 만들고 구성합니다. 클라이언트는 커맨드 인터페이스의 생성자에 수신 클래스의 인스턴스를 포함한 모든 요청 파라미터를 전달해야 합니다.
적용 가능한 경우
- 어떤 작업과 함께 객체를 파라미터화 하려는 경우 커맨드 패턴을 사용할 수 있습니다.
- 커맨드 패턴은 특정 메소드 호출을 독립 실행형 객체로 변환할 수 있습니다.
- 큐에 작업을 넣거나 작업을 스케쥴링, 혹은 작업을 원격으로 실행하고자 한 경우 커맨드 패턴을 사용할 수 있습니다.
- 롤백 가능한 작업을 구현하고자 하는 경우 커맨트 패턴을 사용할 수 있습니다.
장단점
장점
- 어떤 작업을 수행하는 클래스에서 작업을 수행하는 부분만 분리할 수 있기 때문에
단일 책임 원칙을 만족합니다. - 기존 클라이언트 코드를 건드지 않고 새로운 명령을 구현할 수 있기 때문에
개방/폐쇄 원칙을 만족합니다. - 취소 / 다시 실행 기능을 구현할 수 있습니다.
- 지연된 작업을 실행 시킬 수 있도록 구현할 수 있습니다.
- 간단한 N개의 명령 세트를 복잡한 명령으로 조합할 수 있습니다.
단점
- 발신하는 코드와 수신하는 코드 사이에 완전히 새로운 계층을 도입하기 때문에 전체적인 코드가 더 복잡해질 수 있습니다.
예제
현재 4가지의 기능을 하는 리모콘을 가지고 있습니다. 코드는 다음과 같습니다.
1
2
3
4
5
Button.java

public enum Button {
    UP, DOWN, LEFT, RIGHT;
}
1
2
3
4
5
6
7
8
9
10
11
12
13
14
15
16
17
18
19
20
21
22
23
24
25
26
27
28
29
30
31
32
33
34
35
36
37
38
39
40
41
42
43
44
45
46
47
RemoteControl.java

public class RemoteControl {
    List<Integer> channelList = new ArrayList<>(Arrays.asList(1, 2, 7, 9, 11, 16, 20, 23, 27, 30));
    int channel = 1;
    int volume = 5;

    public void volumeUp() {
        if (volume < 10) {
            System.out.println("현재 볼륨은 " + ++volume + "입니다.");
        } else {
            System.out.println("볼륨을 더이상 높일 수 없습니다.");
        }
    }

    public void volumeDown() {
        if (volume > 0) {
            System.out.println("현재 볼륨은 " + --volume + "입니다.");
        } else {
            System.out.println("볼륨을 더이상 낮출 수 없습니다.");
        }
    }

    public void channelUp() {
        int currentChannelIndex = channelList.indexOf(channel);

        if (currentChannelIndex == channelList.size() - 1) {
            channel = channelList.get(0);
        } else {
            channel = channelList.get(currentChannelIndex + 1);
        }

        System.out.println("현재 채널은 " + channel + "번 입니다.");
    }

    public void channelDown() {
        int currentChannelIndex = channelList.indexOf(channel);

        if (currentChannelIndex == 0) {
            channel = channelList.get(channelList.size() - 1);
        } else {
            channel = channelList.get(currentChannelIndex - 1);
        }

        System.out.println("현재 채널은 " + channel + "번 입니다.");
    }
}
1
2
3
4
5
6
7
8
9
10
11
12
13
14
15
16
17
RemoteControlCommander.java

public class RemoteControlCommander {
    private RemoteControl remoteControl = new RemoteControl();

    public void press(Button button) {
        if (button == Button.UP) {
            remoteControl.volumeUp();
        } else if (button == Button.DOWN) {
            remoteControl.volumeDown();
        } else if (button == Button.LEFT) {
            remoteControl.channelDown();
        } else if (button == Button.RIGHT) {
            remoteControl.channelUp();
        }
    }
}
1
2
3
4
5
6
7
8
9
10
11
12
Client.java

public class Client {
    public static void main(String[] args) {
        RemoteControlCommander remoteControlCommander = new RemoteControlCommander();

        remoteControlCommander.press(Button.UP);
        remoteControlCommander.press(Button.DOWN);
        remoteControlCommander.press(Button.LEFT);
        remoteControlCommander.press(Button.RIGHT);
    }
}
리모콘의 위 아래 버튼을 누르면 볼륨을 컨트롤하고, 좌 우 버튼을 누르면 채널을 컨트롤하는 간단한 리모콘입니다.
지금까지는 문제가 없었으나 새로운 버튼을 20개 정도 추가하라는 지시를 받았습니다. 그래서 우리는 RemoteControlCommander클래스의 press() 메소드에 다른 Button이 들어올 경우를 대비하여 20 개의 if-else 문을 추가해야 합니다. (혹은 switch-case문) 또한 RemoteControl클래스에 20개의 메소드를 추가해야 합니다. 이는 개방/폐쇄 원칙과 단일 책임 원칙을 충족하지 않습니다. 그래서 커맨드 패턴을 사용해 코드를 리팩토링 하기로 결정하였습니다.
일단 Command 인터페이스 부터 생성하겠습니다. 인터페이스, 추상 클래스 둘중 본인의 스타일대로 생성하면 됩니다.
인터페이스는 Command 의 구현체에서 RemoteControl을 주입해야 합니다. 추상 클래스는 Command 자체에서 RemoteControl을 주입해야 합니다.
1
2
3
4
5
Command.java

public interface Command {
    void execute();
}
다음은 기존의 RemoteControl 클래스를 변경하겠습니다. 이 클래스는 이제 어떤 행위를 하는 메소드는 없고 필드를 컨트롤 할 수 있는 getter / setter 메소드만 존재할 것입니다.
1
2
3
4
5
6
7
8
9
10
11
12
13
14
15
16
17
18
19
20
21
22
23
24
25
public class RemoteControl {
    private List<Integer> channelList = new ArrayList<>(Arrays.asList(1, 2, 7, 9, 11, 16, 20, 23, 27, 30));
    private int channel = 1;
    private int volume = 5;

    public List<Integer> getChannelList() {
        return channelList;
    }

    public int getChannel() {
        return channel;
    }

    public void setChannel(int channel) {
        this.channel = channel;
    }

    public int getVolume() {
        return volume;
    }

    public void setVolume(int volume) {
        this.volume = volume;
    }
}
다음은 커맨드 인터페이스를 구현하는 구현체 클래스를 만들겠습니다.
1
2
3
4
5
6
7
8
9
10
11
12
13
14
15
16
17
18
19
VolumeUpCommand.java

public class VolumeUpCommand implements Command{
    private RemoteControl remoteControl;

    public VolumeUpCommand(RemoteControl remoteControl) {
        this.remoteControl = remoteControl;
    }

    @Override
    public void execute() {
        if (remoteControl.getVolume() < 10) {
            remoteControl.setVolume(remoteControl.getVolume() + 1);
            System.out.println("현재 볼륨은 " + remoteControl.getVolume() + "입니다.");
        } else {
            System.out.println("볼륨을 더이상 높일 수 없습니다.");
        }
    }
}
1
2
3
4
5
6
7
8
9
10
11
12
13
14
15
16
17
18
19
20
VolumeDownCommand.java

public class VolumeDownCommand implements Command{

    private RemoteControl remoteControl;

    public VolumeDownCommand(RemoteControl remoteControl) {
        this.remoteControl = remoteControl;
    }

    @Override
    public void execute() {
        if (remoteControl.getVolume() > 0) {
            remoteControl.setVolume(remoteControl.getVolume() - 1);
            System.out.println("현재 볼륨은 " + remoteControl.getVolume() + "입니다.");
        } else {
            System.out.println("볼륨을 더이상 낮출 수 없습니다.");
        }
    }
}
1
2
3
4
5
6
7
8
9
10
11
12
13
14
15
16
17
18
19
20
21
22
ChannelUpCommand.java

public class ChannelUpCommand implements Command{
    private RemoteControl remoteControl;

    public ChannelUpCommand(RemoteControl remoteControl) {
        this.remoteControl = remoteControl;
    }

    @Override
    public void execute() {
        int currentChannelIndex = remoteControl.getChannelList().indexOf(remoteControl.getChannel());

        if (currentChannelIndex == remoteControl.getChannelList().size() - 1) {
            remoteControl.setChannel(remoteControl.getChannelList().get(0));
        } else {
            remoteControl.setChannel(remoteControl.getChannelList().get(currentChannelIndex + 1));
        }

        System.out.println("현재 채널은 " + remoteControl.getChannel() + "번 입니다.");
    }
}
1
2
3
4
5
6
7
8
9
10
11
12
13
14
15
16
17
18
19
20
21
22
23
ChannelDownCommand.java

public class ChannelDownCommand implements Command{
    private RemoteControl remoteControl;

    public ChannelDownCommand(RemoteControl remoteControl) {
        this.remoteControl = remoteControl;
    }

    @Override
    public void execute() {
        int currentChannelIndex = remoteControl.getChannelList().indexOf(remoteControl.getChannel());

        if (currentChannelIndex == 0) {
            remoteControl.setChannel(remoteControl.getChannelList().get(remoteControl.getChannelList().size() - 1));
        } else {
            remoteControl.setChannel(remoteControl.getChannelList().get(currentChannelIndex - 1));
        }

        System.out.println("현재 채널은 " + remoteControl.getChannel() + "번 입니다.");

    }
}
커맨드 인터페이스를 구현하는 구현 클래스를 모두 생성하였습니다. 마지막으로 기존 RemoteControlCommander 클래스를 삭제하고 클라이언트 코드를 변경하겠습니다.
1
2
3
4
5
6
7
8
9
10
11
12
13
14
15
16
17
Client.java

public class Client {
    public static void main(String[] args) {
        RemoteControl remoteControl = new RemoteControl();

        VolumeUpCommand volumeUpCommand = new VolumeUpCommand(remoteControl);
        VolumeDownCommand volumeDownCommand = new VolumeDownCommand(remoteControl);
        ChannelUpCommand channelUpCommand = new ChannelUpCommand(remoteControl);
        ChannelDownCommand channelDownCommand = new ChannelDownCommand(remoteControl);

        volumeUpCommand.execute();
        volumeDownCommand.execute();
        channelUpCommand.execute();
        channelDownCommand.execute();
    }
}
커맨드 패턴을 적용한 코드 리팩토링이 완료되었습니다. 이제 새로운 버튼이 생기더라도 커맨드 인터페이스를 상속한 구현 클래스를 새롭게 만들고 클라이언트만 수정하면 됩니다. 즉, 다른 코드를 건들지 않아도 되므로 계방 폐쇄 원칙을 만족합니다. 물론 RemoteControl 클래스에는 필요한 필드들이 생길 수 있습니다. (ex. 외부입력 포트) 그렇다 하더라도 기존의 한 클래스에 모든 메소드를 넣은 방식에 비해 클래스가 필수적으로 가지고 있어야 하는 필드, 메소드들만 가지고 있게 변경되었으므로 단일 책임 원칙을 만족하게 됩니다.
결론
커맨드 패턴은 주로 GUI 프로그래밍에서 많이 쓰이곤 합니다. 어떤 버튼을 눌렀을 때 해당 버튼이 실행할 동작을 구현하고자 할때 주로 사용하지요. 또한 자바 프로그래밍을 하며 쉽게 접할 수 있는 Runnable 인터페이스의 모든 구현체도 커맨드 패턴이 적용된 대표적인 사례입니다.
이렇듯 많은 곳에서 사용되지만 모든 패턴들이 그렇듯 커맨드 패턴 또한 잘못된 설계로 개발이 진행되었을 때 오히려 코드가 더 복잡해질 수 있으니 주의가 필요합니다.
참조
https://refactoring.guru/design-patterns/command https://sourcemaking.com/design_patterns/command/java/1